
Films:
Finding Nemo: http://www.teachwithmovies.org/talking-and-playing/finding-nemo-t-p.html
Barbie in een zeemeermin avontuur
Barbie Mermaidia
De kleine zeemeermin
Finding Nemo: http://www.teachwithmovies.org/talking-and-playing/finding-nemo-t-p.html
Barbie in een zeemeermin avontuur
Barbie Mermaidia
De kleine zeemeermin
Ontstaan van duinen:
http://www.schooltv.nl/beeldbank/clip/20030403_duin01
http://www.schooltv.nl/beeldbank/clip/20030403_duin01
Zeediertjes vangen:
http://www.schooltv.nl/beeldbank/clip/20050503_strandvangst01
http://www.schooltv.nl/beeldbank/clip/20050503_strandvangst01
Prentenboek: Spetteren in het water en spelen met zand!:
http://www.schooltv.nl/beeldbank/clip/20050524_nicky_nick05
http://www.schooltv.nl/beeldbank/clip/20050524_nicky_nick05
Voor in het kastje:
Schelpen
Vloerpuzzel van de oceaan
Oceaandieren
Schelpen
Vloerpuzzel van de oceaan
Oceaandieren
Boeken:
Een kleine vis in een zee van verhalen
Never take a shark to the dentist
The snail and the whale
&
Biebboeken
Een kleine vis in een zee van verhalen
Never take a shark to the dentist
The snail and the whale
&
Biebboeken
Activiteiten:


Naar het strand:

Have a go at sand sculpture. What about making a turtle or a mermaid?
Build a boat or a car in the sand big enough to sit in. Great for imaginary journeys.

Build a "sandman" - the sand equivalent of a snowman. He should turn a few heads!
Make footprints in the sand. They don't have to be your own .. why not try some dinosaur footprints instead?
Fill a large plastic bin with sand. Hide sand dollars, shark's teeth or plastic ocean animals. Kids can take turns searching for items in the sand. Have a variety of pairs of different objects hidden and encourage the kindergartners to look for matching piece.

Strand kunst: http://www.artful-adventures.co.uk/2010/07/27/beach-art/
Nodig: schelpen en stenen op het strand

Aquascope maken voor onder water kijken: http://mayamade.blogspot.com/2010/04/how-to-make-aqua-scope.html
Nodig: plastic yoghurt bak, doorzichtig folie
Seawater Float
Ask students if they have ever swum in salt water. Did they know it is easier to swim or float in salt water than in fresh water? Try this experiment to demonstrate. You will need the following: large glass, warm tap water, 1 raw egg, salt, teaspoon
Fill the glass about half full of warm water.
Carefully slip the egg into the glass. (It should sink to the bottom.)
With the egg in the glass, add 1 teaspoon of salt to the glass and stir gently. Keep adding 1 teaspoon of salt at a time until the egg floats to the surface.
Ocean Bottle
You need: plastic water or pop bottles, blue or green food coloring, baby oil or vegetable oil, tiny shells, and sparkles or gold glitter for sand.
Fill the water bottle 2/3 full with water and tint it with the food coloring and add oil. Fill bottle to about 1/2 inch of the rim. Add tiny shells, glitter, or other sea-related items. Glue the bottle shut and place tape around the top to seal the bottle to prevent the oily liquid from leaking out. When you tip the bottle it will look like rolling ocean waves.
Which Freezes First?
Why do ponds or lakes sometimes freeze in cold weather? Why doesn't the ocean usually freeze? Use this experiment to compare the time required for fresh and salt water to freeze.
You will need the following materials: 2 paper cups, salt, tablespoon, marker, access to a freezer
Fill both cups half full of water.
Add 1 heaping tablespoon of salt to one of the cups and stir until the salt dissolves. Label the cups fresh water and salt water.
Put both cups in a freezer. Check every half hour to see which freezes first.
Repeat the experiment, but now add 1 tablespoon of salt to one cup of water and 2 tablespoons of salt to the other. What will happen?
Seeing Sea Salt
This experiment shows that although salt is invisible in seawater, it is there and remains there even after water evaporates into the air.
You will need the following materials: 2-cup measure, hot tap water, 1/4-cup measure, salt, spoon, pie plate
Put 1 cup hot tap water into the 2-cup measure.
Measure 1/4 cup salt into the hot water and stir until all the salt dissolves.
Put the pie plate on a windowsill or near a heater. Pour in the salt water.
Make an observation chart.
Each day for a week, check the pie plate and record what you see. After a week, report the findings to the class.
Ocean Motion
You will need the following materials: newspapers, rectangular pan, water, food coloring
Spread out several layers of newspaper to protect the work surface.
Fill the pan halfway with water.
Have children take turns blowing across the surface of the water. What happens if they blow gently? What happens if they blow very hard?
Put a drop of food coloring into the water at one end of the pan. Have children blow from that end of the pan. What happens to the colored "current"?
Floating Hot and Cold
A major effect of currents is the mixing of colder and warmer ocean waters. Water temperature varies in different places. Water near the North and South Poles is very cold, while water near the equator is much warmer. At any location, surface water is warmer than deeper water. Here's a way to observe how temperature variations influence ocean currents.
You will need the following materials: glass bowl, pitcher of ice water, pepper, measuring cup of hot tap water, food coloring
Fill the bowl two-thirds full with ice water. Sprinkle some pepper on the surface of the water to help children see the movement of the "currents".
Color the hot water with several drops of food coloring. Slowly pour about one-forth cup of hot water into the bowl of ice water. It should stay on the surface in a discernable layer because cold water is more dense than hot water.
Have students observe what happens as the hot water cools. (It should begin to sink, mixing with the colder water; watch how the pepper moves.)
Repeat the experiment, but reverse the position of the two temperatures of water. This time, start with a bowl of hot water. Pour colored ice water into the bowl. What should happen?
Sandy Shores
You will need the following materials: sugar cubes, empty jars with covers
Ask the class what they would feel under their feet if they walked barefoot on a beach. Sand, of course! As children share their ideas, ask them to describe what sand feels like.
Then ask the children to think about what sand is made of. guide them to learn that grains of sand are tiny pieces of rocks and shells that rivers and streams have tumbled and banged against each other. Over time, these rocks have broken into very tiny pieces. The rivers then carry these tiny pieces , which are now sand, to the oceans, where tides and currents bring the sand up onto the beach.
To give the students an idea of how rocks can be broken into tiny grains of sand, divide the class into groups. and give each group a jar with a few sugar cubes in it. Let the group members take turns shaking the sugar cubes in the jar to see what happens when they tumble and bang against each other.
Making Sand
You will need the following materials: small rocks and shells, hammer, box
This activity is similar to the activity above. Talk about sand with the children. What is sand? Where does it come from? How is it made?
Set out hammer and small pieces of rocks and shells.
Place the rocks and shells inside the box lid and let children take turns smashing the rocks and shells until it is sand. (I recommend adult supervision with this activity.)
Examining Sand
You will need the following materials: magnifying glasses, sand, rocks, shells
Place the above materials on a table in your Science center.
Following a discussion about sand, let the children go to the Science center and explore the similaritites and differences between the sand, the rocks, and the shells.
Sandscapes
You will need the following materials: sand, large jars with covers, food dye (red, blue, green, yellow), plastic spoons, clear plastic glasses or glass jars, narrow tools such as knitting needles
Fill four jars with sand, leaving enough empty space at the top to shake the sand when the jar is covered.
Squeeze about ten drops of different-colored food dye into each jar, cover the jar, and let a child shake it until the sand is colored.
Demonstrate how to spoon layers of different-colored sand into clear cups or jars. The more contrasting layers, the prettier the finished product will be. If they are using jars or bottles with covers, it's best to fill them almost to the top.
Show the children how to make interesting designs by poking the point of a knitting needle down the side of the jar or cup, allowing the colors on top to penetrate down to lower layers. By moving the point in different ways, you can create a variety of patterns.
View of the Ocean Bottom
Provide students with a sturdy white paper plate. Have them spread glue across the bottom quarter of the plate and sprinkle with sand. Add tiny seashells. Then they can create their own ocean scene using green twisted strips of paper to create seaweed and small pieces of colored construction paper for fish and other creatures. If needed, students can be provided pre-drawn creatures to color and cut out and glue to the plate. (Make sure you have at least one or more models for them to look at when doing this project.) When they're finished, stretch blue plastic wrap tightly across the top of the plate and secure with tape to give the scene and underwater look.
Ook met een krab en zeester erbij. Of een kreeft.
Verkleinen: http://www.first-school.ws/t/cpcrab.htm
Verkleinen: http://www.first-school.ws/t/cpstarfish1.html
Verkleinen: http://www.first-school.ws/t/cplobster.html
Scheerschuim: in scheerschuim letters schrijven
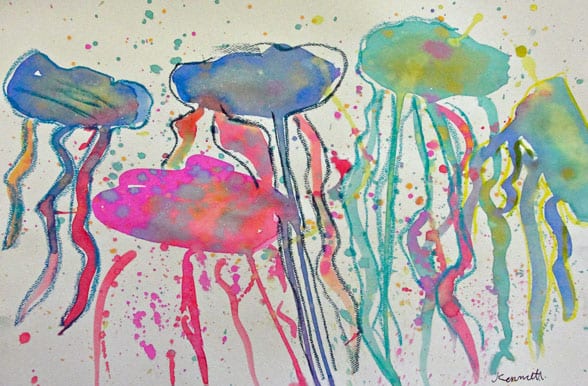
Kwallen waterverven: http://www.deepspacesparkle.com/2011/03/watercolor-jelly-fish-art-video/
Nodig: waterverf, waterverfpapier, waskrijtjes


Vouwpapier vissen: http://krokotak.com/category/zadatchki-za-fina-motorika/kasane-lepene-i-pregavane-na-hartiya/
Nodig: vouwpapier

Zeester balletjes gooien: Zeesterren met daarin een plastic bekertje met wat zand (zodat ze blijven staan). De kinderen moeten proberen een balletje in het bekertje te gooien.

Vissen in het wier: Laat de kinderen 2 hele grote vissen beschilderen, uitknippen en niet ze tegen elkaar. Krantenproppen ertussen en je hebt prachtige driedimensionale vissen. Wierslingers van crepe papier. Alles aan het plafond hangen. Of aan een touw hangen.


Aquarium maken: Een leuk aquarium voor aan de muur.
Printables:
Oceaan Maze: http://kids.nationalgeographic.com/staticfiles/NGS/Shared/StaticFiles/NGKids/Image/australia-maze-little-kids-2.jpg
Oceaan Maze: http://kids.nationalgeographic.com/staticfiles/NGS/Shared/StaticFiles/NGKids/Image/australia-maze-little-kids-2.jpg
Onderwaterdieren met achtergronden:
http://www.kleutergroep.nl/Onderwater/oco_00.pdf
http://www.kleutergroep.nl/Onderwater/om00.pdf
http://www.kleutergroep.nl/Onderwater/oco_00.pdf
http://www.kleutergroep.nl/Onderwater/om00.pdf
Cijfers schrijven oefenen:
http://www.kidzone.ws/math/ocean/index.htm#KINDERGARTEN
http://www.kidzone.ws/math/ocean/index.htm#KINDERGARTEN
Hoeveel zijn het er:
http://archjrc.tripod.com/activity/sea.html
http://archjrc.tripod.com/activity/sea.html
Spelletje:
Online orka kleurplaat inkleuren:
http://www.seaworld.org/fun-zone/games/coloring-book/killer-whale/index.htm
Online orka kleurplaat inkleuren:
http://www.seaworld.org/fun-zone/games/coloring-book/killer-whale/index.htm
Dit is ons groene kastje van deze week:

Met 5 kindjes en veel werk in het huishouden heb ik echt geen tijd en energie meer over om zo'n leuke projectjes in elkaar te steken. Dit is echt heel bruikbaar. Bedankt voor het delen!
BeantwoordenVerwijderen